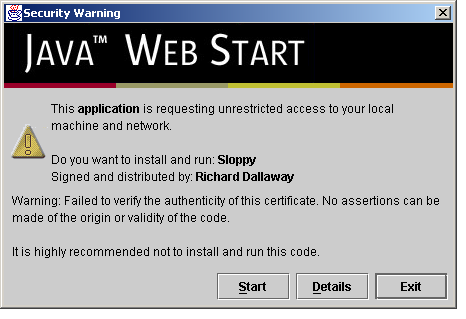
Figure 1: Sloppy starting with a developer certificate.
| dallaway.com - Writing - Web Start and Code Signing |
Richard Dallaway, Spiral Arm Ltd.
May 2002
I had what I thought were two separate problems: how to provide an easy way to install a Java application I'd written; and how to start a web browser from the application regardless of what operating system the application was running on. Both problems were solved by using Java Web Start, but to get that working I also had to dip into the world of code signing with digital certificates. These are my notes on the experience.
Changes:
keytool -import. It seems there's been a change to the format of the certificate and you
now need to hand edit the file before you import it. See my example before and
after examples to see what you have to do. I've asked
Thawte to look into this.Sloppy
Sloppy is an application that can be used to slow down your internet connection. Often a web site is developed on a fast local network. To see how it would look to a 28.8k or 56k modem user, you could install the appropriate modem, get a dial-up account, configure your machine to use the dial-up... all this generally involves much cursing. And if you want to see what conditions are like under a 28.8k modem and and 56k modem, repeat the above.
Or you could use Sloppy. Sloppy is a “slow proxy”. It pretends to be the web site you're testing, and artificially slows down the flow of web pages and graphics to your browser. It's not perfect, but it's easier than fiddling around with modem cables.
When I first wrote Sloppy, it ran as a server application. You had to have Java installed, get yourself to a shell or command prompt, run the right magic command, edit the right configuration file, and also launch your web browser on just the right address to see the results. From the feedback I received, it seemed that Sloppy needed an easier way to be installed and a graphical user interface.
Web start
Putting a graphical front end on Sloppy wasn't so hard, but I need a way to get Sloppy installed. I also decided that because of the way Sloppy worked I wanted to be able to start the user's web browser. At the same time, I wanted to keep all of this platform-neutral: it should run on Macs, Linux, Sun kit, Windows machines ... all without modification.
Web Start has all the key ingredients. You can think of web start as a browser plug-in. When you click on a link to a .jnlp file, the plug-in takes over, downloads the application, makes sure you have the right version of the Java runtime (installs it if necessary), performs a bunch of security checks, and then launches it for you.
Writing a Web Start application just means writing a regular Java application and providing a .jnlp file. For Sloppy the file looks like this:
<?xml version="1.0" encoding="UTF-8"?>

<jnlp spec="1.0+" codebase="http://www.dallaway.com/sloppy" href="sloppy.jnlp">

  <information>
     <title>Sloppy</title>
     <vendor>Richard Dallaway</vendor>
     <homepage href="index.html" />
     <description>Sloppy allows you to simulate different dial-up speeds.</description>
     <offline-allowed />
   </information>

  <resources>
     <j2se version="1.3+"/>
     <jar href="sloppy.jar" main="true" />
   </resources>

  <application-desc main-class="com.dallaway.sloppy.Sloppy"/>

  <security>
     <all-permissions/>
  </security>

</jnlp>
The file states where to find Sloppy (the codebase), the names of the Jar files to download (sloppy.jar), the version of the Java runtime required (1.3 or better), gave some descriptions about the application, and said which main() method to run to start Sloppy.
So, with Web Start I had the way to install the application on a user's machine, a way to keep it up to date, and also a way to launch the user's web browser (that's one of the “services” web start gives a developer). The end user gets a relatively hassle-free way of running Java applications and some faith that the security is going to be sound.
Certificates
The only tricky part to all of this was the security. By default, Web Start has a very strict security policy. This is a good thing, because you know a Web Start application won't go and trash your hard drive, start looking through your email, or send messages over the net to some ad company.
The nature of Sloppy is such that it needs to be able to talk to other web sites. That's what it does: it takes your requests, sends it to a web site, and then slows down the response. For this to work under Web Start, I needed to give Sloppy some extra security permissions. In fact, the current version of Web Start means that I have to give Sloppy unrestricted access to your computer. This is a bit over-the-top, but it's all or nothing right now. In the future the JNLP specification might allow more fine-grained permissions.
To get this unrestricted permission I have to “sign” the application. This proves that it's me that sent the code, and that no-one has tampered with it. If you trust me, you can run the code, safe in the knowledge that I'm not interested in the contents of your hard drive or your email.
To be able to digitally sign the code (the JAR files), I needed a certificate. To get a certificate, I needed to hand over money to a certificate authority so they could run some background checks on me to prove that I am who I say I am. Web Start comes with a list of certificate authorities it knows about. One of them, Verisign, would like US$200 to US$400 from me each year for a certificate. I'm not sure I'm willing to pay that for software I'm giving away.
To see why this is important, take a look at the screen-shot of how Sloppy starts if I use a fake certificate (figure 1).
Figure
1: Sloppy starting with a developer certificate.
Notice the worrying phrases such as “it is highly recommended not to install and run the code”? The point of this exercises was to make Sloppy more available, not to scare everyone off.
I took a good look at the list of certificate authorities known to Web Start and one stuck out: Thawte Freemail. In particular, the word “free”. I chased this down and it is indeed a free (no money) way to get a certificate for code signing.
The steps are simple enough:
Sign
up for a "personal email certificate". There are quite a few screens to fill in, but follow
the process through up until the point where you're
asked to select the X.509 email certificate you want. At that point
scroll down to “Developers of New Security Applications ONLY”, follow the link
and select "Paste-in CSR Certificate Enrollment". There's quite a bit of clicking from this
page to get to the page with a text box that allows you to enter your public key. When you get
to the "public key" page you need to generate a key with keytool.
Run the Java keytool
utility.
First, generate a RSA key. You'll be asked all
sorts of information. The important thing to remember is that your
name must be set according to the common name you're told to use on
the Thawte web site. It'll be something like XVV6ePaMGHEPJN22. When the keytool prompts
you to enter your name, enter this value from Thawte. The
other important thing to remember is the password you use when you
create a key, because you'll need it to sign your application.
Obviously change your “alias” name
and the location of the “keystore” file if you like, but
run something like this:
keytool
-genkey -keyalg RSA -keystore keystore.ks -alias myalias
Here's an example run:
$ keytool -genkey -keyalg RSA -keystore keystore.ks -alias myalias
Enter keystore password:  trustno1
What is your first and last name?
  [Unknown]:  XVV6ePaMGHEPJN22
What is the name of your organizational unit?
  [Unknown]:  sloppy
What is the name of your organization?
  [Unknown]:  dallaway.com
What is the name of your City or Locality?
  [Unknown]:  Brighton
What is the name of your State or Province?
  [Unknown]:  E. Sussex
What is the two-letter country code for this unit?
  [Unknown]:  GB
Is CN=VsrM6zxs7edzfJ57, OU=sloppy, O=dallaway.com, L=Brighton, ST=E. Sussex, C=GB correct?
  [no]:  yes

Enter key password for <myalias>
        (RETURN if same as keystore password):
$
Next, export the key to a text
file, which in this example is “csr.txt”:
keytool
-certreq -keystore keystore.ks -file csr.txt -alias myalias
Take the text of “csr.txt”
and paste it into the Thawte form and wait. That's your certificate
request. Mine took about 20 minutes to process, and I was notified
that it was ready by email.
When you download your
certificate, it's in two formats: Netscape and PKCS7. You want the
save the PKCS7 version in a file called “my.cert” (or
similar) and then run:
keytool
-import -file my.cert -alias myalias -trustcacerts -keystore
keystore.ks
You should see the message: Certificate reply was installed in keystore
However, Thawte have changed their certificate format, causing the above step to fail (e.g., with an error message something
like sun.security.pkcs.ParsingException: toDerInputStream rejects tag type -96). I'm hoping
this is a temporary situation that Thawte will fix. In the meantime, if the above import command fails,
it could be because of Thawte's change to their file format. Nicolas Carranza
has kindly supplied some Java source for fixing the Thawte certificate format problems.
I've packaged this as a jar to download. Run it like this:
java -jar thawtecleaner.jar my.cert and
it will create my.cert.clean, which you
can then use in the keytool -import command, above.
If you run into a java.security.cert.CertificateException: Unsupported encoding error during the
import, try the following: Add two carriage returns at the end of the downloaded certificate file; and
also change the Begin and End lines so that only BEGIN PKCS#7 and END PKCS#7 appears.
That's it. You have a certificate that's good for a year, after which it can be renewed (see below).
To sign the code with the certificate, you can run an Ant task such as:
<signjar keystore="keystore.ks"
jar="sloppy.jar"
alias="myalias"
storepass="trustno1" />
When
I ran the Web Start with my newly signed application I get a much
more respectable prompt, as shown in figure 2:
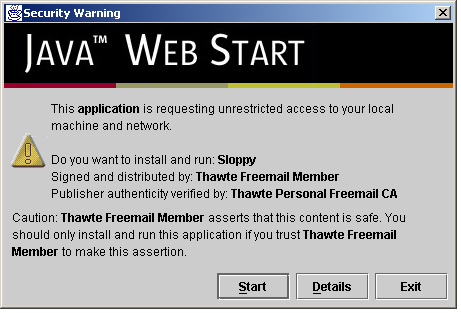
Figure
2: Sloppy starting with a Thawte Freemail certificate.
Renewal
After one year you'll need to renew the certificate to avoid presenting users with warnings about an expired certificate. The renew process means re-running the steps needed to create a certificate. As your common name changes with each renewal, there's no easy way to "renew" an existing certificate: you'll probably want to either delete your keystore file before starting or run the commands with a different alias name.
For those who like to follow screen shots, I've provided a page showing the steps to renew. But bare in mind that Thawte change their web site from time-to-time so these images may not quite match what you see.
Web of Trust
It may be possible to replace the phrase “Thawte Freemail Member” in the certificate by joining the Thawte Web of Trust. This involves meeting individuals already OK-ed by Thawte and demonstrating that you are who you say you are by producing various forms of identification. I've not tried this yet.
Another alternative to look forward to is the supply of free certificates from CAcert.org. I say look forward to because at the time of writing the CAcert.org root certificate is not installed by default in web start meaning that a certificate signed by CAcert won't be recognized by web start. It's straight forward to add the certificate to web start, but it might not be an option for you right now if you're interested in making things as hassle-free as possible for your users. In time it might well be incorporated into web start, and at that point it will be the solution to go for.
A note about Java Micro Edition (was: J2ME)
Summary
Java Web Start is a useful way to deploy Java applications. To gain the trust of end users it's important to sign the code being downloaded, but it is possible to do this at no cost using the Thawte Freemail service. In the future CAcert.org will be the place to go for free certificates.
A note on third party JAR files
Files referenced by your JNLP file need to all be signed using the same certificate. If you want to include files signed in other ways, such as third-party JARs (Java Mail, JAX-B, for example) then you need to use the extension tag in the JNLP. For example in the resource section add:
<extension name="Jaxb" href="jaxb.jnlp"/>
Web start will request jaxb.jnlp from your site (in this case, the same location as your .jnlp file) and will process it using the certificate found in the jar referenced by jaxb.jnlp. To learn more look for "Component Extension" in the JNLP specification.
Resources
|